What is Static and Dynamic IP Address?

Dynamic IP Address

Dynamic IP Address as the name suggests is a temporary IP Address. When a device is connected to your home network then it is assigned an IP Address which is mostly a dynamic IP Address. New devices that join your network is assigned a dynamic IP address by a Dynamic Host Configuration Protocol (DHCP) server. As new devices join the network, the IP address might change for your device. Dynamic IP addresses are useful in such cases where IP addresses are limited and devices often join or leave the network.

Static IP Address

As the name suggests, Static IP Address isn’t a temporary IP address, but rather a permanent one. It doesn’t change over time and is useful for hosting websites, sharing large files, and remotely accessing devices or networks. Static IP Addresses have many uses nowadays and most people prefer to link their domain name or server accounts to a static IP address.
MyWifiExt – mywifiext.net

MyWifiExt.net is a local web address for NETGEAR Wireless Ranger Extenders which is used to open the Settings Panel (Smart Wizard or Genie) of NETGEAR Wireless Range Extenders.

This website is a local web address mean if you were to access MyWifiExt.net then you might receive an error or wouldn’t be able to connect to the website at all unless you’re connected to the NETGEAR Range Extender through an Ethernet Cable or wirelessly connected via Wi-Fi connection.

Continue reading “MyWifiExt – mywifiext.net”

How to factory reset NETGEAR Router?

When you have messed up the settings of your Wi-Fi Network or have forgotten the login password then a Factory Reset comes in handy! Once you perform a factory reset, it resets all of the personalized settings, username, password, network name, and security settings to the default ones. If you happen to have forgotten your password or have messed up the settings then the best option that you have is to perform a factory reset which will revert all the settings back to the default.

How to factory reset NETGEAR Router?

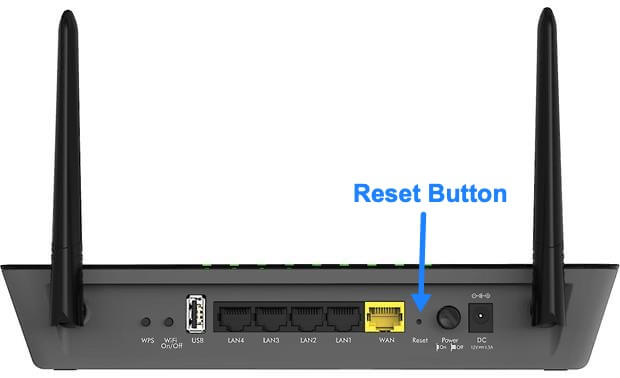
To perform a factory reset on your NETGEAR Wi-Fi Router, follow these steps:

  1. Make sure that your NETGEAR Router is on and working.
    NETGEAR Router
  2. Locate a small hidden button on the back of your router which says Restore Factory Settings or Reset.
  3. Take a small, sharp, pointy object such as a needle, paper clip or any other similar object and now press and hold that button for about 10 seconds.
  4. Release the Restore Factory Settings or Reset button.
  5. The router will now restart and all the settings will be back to the default ones. (The default username is “admin” and the default password is “password”)

How to change NETGEAR Wi-Fi Password?

The default password of your NETGEAR Wi-Fi Network is written under your Router. However, that is a collection of random alphabets and letters. Although it is a strong password and no one can guess it easily still, when you’re trying to connect to the network on a new device then it gets hard to remember that password. Therefore, it is better that you change the password of your NETGEAR Wi-Fi Network.

Continue reading “How to change NETGEAR Wi-Fi Password?”

192.168.0.1

For all the NETGEAR Routers, 192.168.0.1 is an alternate IP address that lets you access the NETGEAR Admin Panel. When you are unable to access the Admin Panel through www.routerlogin.net or www.routerlogin.com from your Web Browser then you can use the alternate, 192.168.0.1 to access your NETGEAR Admin Panel. So, if you are unable to access www.routerlogin.com/www.routerlogin.net then you can use the alternate 192.168.0.1 to access the Admin Panel for your NETGEAR Router and make the required changes.

Continue reading “192.168.0.1”

192.168.1.1

192.168.1.1 is the alternate IP address that you can use to access your NETGEAR Admin Panel. When you are unable to open www.routerlogin.net or www.routerlogin.com from your Web Browser then 192.168.1.1 comes in handy as it can be used to access your NETGEAR Admin Panel. So, if you are unable to access www.routerlogin.com then you can easily use 192.168.1.1 to access the Admin Panel for your NETGEAR Router and make the changes required changes in the settings.

How to access NETGEAR Router Admin Page using 192.168.1.1?

192.168.1.1 Login

Just like you access NETGEAR Router Admin Page through www.routerlogin.com, you can do so through 192.168.1.1. Make sure that you are connected to the NETGEAR Router’s network. Once you are connected, follow these steps to access NETGEAR Router Admin Page.

  1. Launch your default Web Browser that you frequently use to access the Internet.
  2. In the address bar, type 192.168.1.1 or http://192.168.1.1.
  3. Press Enter.
  4. Type in the user name and password in the given fields. The default username is “admin” and the default password is “password”. (Both username and password are case-sensitive.)
  5. Click on Log In.
  6. You will now be logged in into your NETGEAR Router Admin Page.